

Sunday, 21 July 2013
HOW TO SET PASSWORD ON ANY APPLICATION IN PC
Hello friends, today I am going to tell you a trick to make your pc softwares password protected.
It means whenever anyone open any software in your pc then he/she will
be asked for a password if the user don't know the password then he can
not use the software. If you are interested to protect your pc softwares
with password then just follow below steps

Rapidshare,Turbobit Premium Link Generator

Rlslog - Hotfile, Filefactory, Uploaded.net, Bitshare, Letitbit, Crocko, Extabit, Ryushare. MaxFileSize: 2GB
Im3dia - Uploaded.net. MaxFileSize: 1.59GB
Igenerator - Youtube, Netload, Dailymotion, Filefactory, Rapidshare Link generator
Leecher - Turbobit
Turbo - Uploaded.net, Letitbit, Turbobit, Depositfiles, Extabit, Hotfile, Rapidgator, Crocko, 4shared
Turbogen - Turbobit Link generator
Rapidshare,Turbobit Premium Link Generator
Sunday, 16 June 2013
Top 10 computer mouse tips everyone should know
 Most computer users don't take full advantage of the computer Mouse. Below
are computer mouse tips and secrets that help you get the full potential of your
computer mouse and increase your overall productivity while on the computer.
Most computer users don't take full advantage of the computer Mouse. Below
are computer mouse tips and secrets that help you get the full potential of your
computer mouse and increase your overall productivity while on the computer.
Shift key and mouse click
Many text editors
and programs allow you to highlight all or portions of text using the Shift key and the mouse. For example,
place the cursor at the beginning of a
paragraph in a text editor, hold down the Shift key and
click at the end of the paragraph to
highlight the full paragraph.
Bonus tip: Holding down the
Alt key while dragging and highlighting
text in a text editor will allow you to selectively highlight text. This can
be useful if your paragraph or other text is in a column.
Take full advantage of the scroll wheel
Today, everyone is familiar with a
mouse wheels ability to
scroll up and down on a page. However, this wheel can also do so much more,
below are just a few examples.
- The mouse wheel is not just a wheel, it can also be used as a button. Pressing down on the wheel will act like a third mouse button. This can be used to open a web page in a tab by clicking the wheel on any link and can also be used to close a tab by clicking the wheel on any open tab.
- Holding down the shift key while scrolling up or down in a Internet browser will quickly go back and forward between web pages.
- Zoom in and Out on a web page, word document, excel spreadsheet, etc. by holding down the Ctrl key and scrolling up to zoom in and down to zoom out.
- Move forward and backwards while browsing the Internet by holding down the Shift key and scrolling up and down. Scrolling down goes back and scrolling up goes forward.
- Some mouse wheels can be pushed left or right to also move back and forward on a web page.
Select with double and triple click
Any word can be selected by double-clicking the word.
If you want to highlight the whole paragraph, click the mouse button three
times on any text in the paragraph.
Tip: If you double-click you can also double-click and then drag your mouse to select one word at a time.
Use the right-click
Take full advantage of the right-click any time you highlight
text or wish to view the properties of an object. For example, if you
highlight a file or text, you can right-click that highlighted item copy it
and then right-click anywhere else to paste it.
Tip: If you
right-click on any file or text and drag it while continuing to hold the
right button, when you let go you will be given the option to move or copy
that file or text. This saves you the extra step of having to right-click
where you want to paste the item.
Tip: While in a
browser pressing and holding Ctrl while clicking on any
link will open that link in a new
tab.
Ctrl key and mouse click or highlight
While holding down the Ctrl key you can left-click to select multiple
objects or highlight multiple sections of text. For example, in Microsoft
Windows you could hold down the Ctrl key and click to select multiple files
at once. If you wanted to highlight different parts of a paragraph or web
page, you could also hold down the Ctrl key and select each section you
wanted to copy.
Tip: Mozilla
Firefox users can also hold down the Ctrl key and individually click on each cell
in a table they wish to copy or drag
their mouse down a row to select just that row or text without selecting any
of the other text in that table.
Use the mouse side buttons
Many new computer mice have buttons on the side of the mouse.
These buttons can be programmed to do anything, however, by default the
left-thumb button can be used to go back on a web page. This makes browsing
the Internet more enjoyable since you do not need to move the mouse cursor
to the browser back arrow button in order to go back a page.
Use the Windows Snap To feature
Take full advantage of the Windows mouse Snap To
feature, which will automatically move your mouse to buttons that appear in
a dialog box. For example, if you delete a file or close a window you may
get a prompt asking you if you are sure you want to perform the task. With
the Snap To feature enabled, the mouse cursor automatically moves to the Ok
button, so all you will have to do is click the mouse button if you agree.
This saves you the time of having to move the mouse cursor over to the Ok
button and then click Ok. To enable this feature open the Mouse properties
under the Windows Control Panel and
check the Snap To check box under the Pointer Options tab.
Tip: While
changing this feature we also suggest looking at other available options in
the Mouse settings. For example, increasing the Motion speed can also help
increase your productivity while using the mouse.
Manage the open window with the mouse
Double-click the top title
bar of any window to maximize a
window or if it is already maximized resize it to a window. You can also
double-click the icon for the window in the top-left corner of the window to
close that window.
Move the mouse with your keyboard
Instead of using the mouse that came with your computer you
can also enable Windows to use the number
pad as a mouse.
Customize your mouse
Finally, if you have a mouse with more than two buttons,
installing the included mouse software will allow you to customize the mouse
even more. For example, if you don't use the side buttons to move back and
forth in a web page change it to something you do more often, such as
switching between open windows or opening the calculator.
Top 10 keyboard shortcuts everyone should know
 Using keyboard shortcuts
can greatly increase your productivity, reduce repetitive strain, and help keep
you focused. For example, highlighting text with the keyboard and pressing Ctrl
+ C is much faster than taking your hand from the keyboard, highlighting the
text using the mouse, clicking copy from the file menu, and then putting your
hand back in place on the keyboard. Below are our top 10 keyboard shortcuts we recommend everyone memorize and use.
Using keyboard shortcuts
can greatly increase your productivity, reduce repetitive strain, and help keep
you focused. For example, highlighting text with the keyboard and pressing Ctrl
+ C is much faster than taking your hand from the keyboard, highlighting the
text using the mouse, clicking copy from the file menu, and then putting your
hand back in place on the keyboard. Below are our top 10 keyboard shortcuts we recommend everyone memorize and use.
Ctrl + C or Ctrl + Insert
Copy the
highlighted text or selected item.
Ctrl + V or Shift + Insert
Ctrl + Z and Ctrl + Y
Undo any
change. For example, if you cut text, pressing this will undo it. This
can also often be pressed multiple times to undo multiple changes.
Pressing Ctrl + Y would
redo the undo.
Ctrl + F
Open the Find in any program. This includes your Internet browser to find text on the current page.
Alt + Tab or Alt + Esc
Quickly switch between open programs
moving forward.
Tip: Press
Ctrl + Tab to switch between tabs in a program.
Tip: Adding
the Shift key to Alt + Tab or Ctrl +
Tab will move backwards. For example, if you are pressing Alt + Tab and pass
the program you want to switch to, press Alt + Shift + Tab to move backwards
to that program.
Tip:
Windows Vista and 7 users can also press the
Windows Key + Tab to switch through
open programs in a full screenshot of the Window.
Ctrl + Back space and Ctrl + Left or Right arrow
Pressing Ctrl +
Backspace will delete a full word at
a time instead of a single character.
Holding down the Ctrl key while pressing the left or right arrow will
move the cursor one word at a time instead of one character at a time.
If you wanted to highlight one word at a time you can hold down Ctrl +
Shift and then press the left or right arrow key to move one word at a
time in that direction while highlighting each word.
Ctrl + S
While working on a document or other file in almost every
program pressing Ctrl + S will save that file. This shortcut key should be
used frequently anytime you're working on anything important.
Ctrl + Home or Ctrl + End
Move the cursor to the beginning or end of a document.
Ctrl + P
Print
the page being viewed. For example, the document in Microsoft Word or the
web page in your Internet browser.
Top 10 Windows 8 tips and tricks
Customize your tiles
 Make
the most of your Windows Start screen tiles by adjusting the sizes,
where they are located, and what is listed.
Make
the most of your Windows Start screen tiles by adjusting the sizes,
where they are located, and what is listed.- Move any tile by clicking and dragging the tile. While moving a tile, if you need a larger view of the Start screen move the tile towards the top or bottom of the screen to zoom out.
- Use your mouse wheel to scroll left-to-right through your tiles.
- Any Desktop shortcut or program can be pinned to the Start screen by right-clicking the icon and choosing Pin to Start.
- In the bottom right-hand corner of the start screen is a magnifying glass with tiles, click this icon to get a zoomed out view of your Start screen. In this view, if you right-click on a group of tiles you'll be given the option to name group, which can be useful if you have a group of related tiles (e.g. games). In this view, you can also click and drag a group to organize your tile groups.
- Create a new speed bump between tile groups by moving a tile to a speed bump.
- Resize any User tile or Live tile by right-clicking the tile and choosing resize.
- If there is a tile you want on your Taskbar, right-click the tile and choose Pin to taskbar.
- Show admin applications on the Start screen by clicking Settings in Charms, click Settings, and change the Show administrative tools from No to Yes.
- In Internet Explorer 10, you can also pin any of your favorite web pages to your Start Screen.
Windows 8 keyboard shortcuts
Knowing at least some of the Windows 8 keyboard shortcuts will make your Windows 8 experience much more enjoyable.
Try to memorize these top Windows 8 shortcut keys.
- Press the Windows key to open the Start screen or switch to the Desktop (if open).
- Press the Windows key + D will open the Windows Desktop.
- Press the Windows key + . to pin and unpin Windows apps on the side of the screen.
- Press the Windows key + X to open the power user menu, which gives you access to many of the features most power users would want (e.g. Device Manager and Command Prompt).
- Press the Windows key + C to open the Charms.
- Press the Windows key + I to open the Settings, which is the same Settings found in Charms.
- Press and hold the Windows key + Tab to show open apps.
- Press the Windows key + Print screen to create a screen shot, which is automatically saved into your My Pictures folder.
Know your hot corners
The corners on your screen are hot corners and give
you access to different Windows features. Below, is a brief
explanation of each of these corners.
Bottom Left-hand corner
The bottom left-hand hot corner of the screen will
allow you to access the Start screen, if you're in the Start screen
and have the Desktop open, this corner will open the Desktop from
the Start screen.
Tip: Right-clicking in the
left hand corner will open the power user menu.
Top-left corner of the screen
Moving the mouse to the top-left corner and then down
will display all the apps running on the computer. Clicking and
dragging any of these apps to the left or right-hand side of the
screen will snap that app to that side of the screen. Each of these
open app icons can also be right-clicked to close or snap.
Right-hand side of the screen
On the full right-hand side of the screen will be
given access to the Windows
Charms.
Taking advantage of search
The Search in Windows 8 has been significantly improved when
compared to all previous versions of Windows.
To search for a file or run a program in Windows 8 from the Start screen
just start typing what you're trying to find or want to run.
As you
begin typing, the results will start appearing on the left-hand
side. In addition to being able to search for files and run
programs, the Search also supports limiting the search to apps
such as Finance, People, Maps, Photos, Mail, Music, Videos,
Weather, and much more. If what you are searching for is not a
file or program, click on the app you wish to use as the search.
For example, if you were searching for "New York" and selected
the Weather App you would be shown the weather in New York, NY.
By default, Search organizes the available Apps by how frequently
they are used and then in alphabetical order. If you want to keep
your favorite app at the top of the Search list, right-click the app and
choose Pin. Pinning the app will lock it in place
regardless of how often it is used. If there is an app you don't
want (e.g. Finance) you can
turn on and off any of the search apps through the PC settings,
which is found under the Settings in the
Charms.
Bonus tip: The Search is also found
through Charms and can
also be opened by pressing Windows key + F.
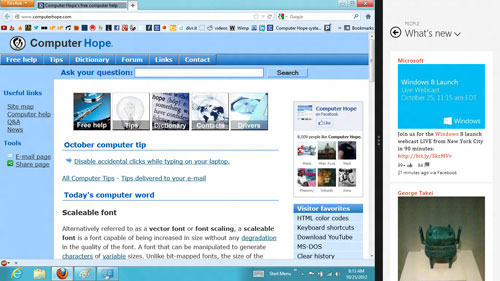
Running two apps side by side
Any app can be pinned to the left or right-hand side of the
screen. For example, open the People app and then press the
Windows Key + . (period) to move that app to the right-hand
side of the screen, pressing the same keys again will move it to
the left-hand side, and pressing the same keys again will make
it full screen. While an app is pinned, any other app or program
can be opened and loaded into the available space on the screen.
For example, in the below picture, we've opened a browser window
and have the People app running to monitor our social networks.
Any open app can also be pinned using your mouse by
clicking at the top of the tile and dragging it to the left or
right-hand side of the screen.
Bonus tip: The Desktop can also be
pinned to the left or right-hand side of the screen.
Note: In order for snap to work
properly your resolution must be at least 1,366 x 768.
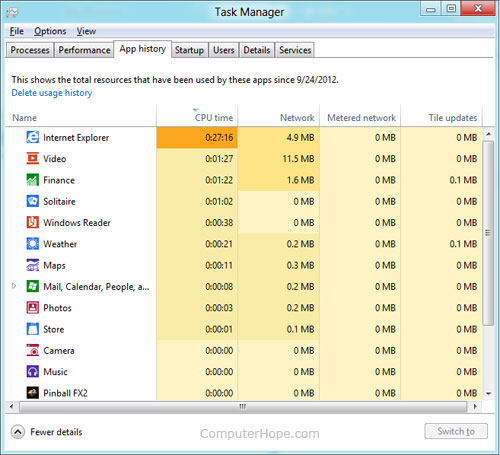
Windows 8 Task Manager
The Windows 8 Task Manager
has been significantly improved over previous versions of
Windows. Some of the new changes include showing a total percent
usage at the top of your Processes, which makes it easier to
determine total memory and CPU usage, improved Performance
graphs, a Startup tab to see startup processes and their impact
to system performance, and the App history tab (as shown below)
that gives you the total resources an app has used over a period
of time. Press Ctrl + Shift + Esc to start exploring the
new Task Manager.
Use a picture password to log into your computer
Windows 8 includes a new feature called
Picture password,
which allows you to authenticate with the computer using a series
of gestures that include circles, straight lines, and taps.
Enable this feature if you want a new way to access your computer
or have a hard time with passwords.
- Open the Windows Charms.
- Click Settings and then More PC settings
- In the PC settings window click Users and then select Create a picture password
Bonus tip: A four digit
pin password can also be
created and used to access your computer.
Take advantage of Windows 8 apps
Windows 8 comes included with several apps to help you get the most
from your computer. Below are just a few of the
included apps.
People
Microsoft touts the People feature in Windows 8 because they
understand how many people are using social networks today. In
the People feature you'll be able to connect your Windows
computer to all the major social networks including
Facebook,
LinkedIn, and
Twitter. Once connected, you can pin the people app
and monitor your social network (as shown below), use People in
Search to find people, and get an overview of what is happening
in all your social
networks.
Reader
The Reader app will give you PDF
support right out of the box.
SkyDrive
The SkyDrive app will give you access to the Microsoft
cloud service SkyDrive, which allows you
to store your photos, documents, and other files in the
cloud and
access or share those files with any computer with Internet
access.
Store
Take advantage of the Windows Store and install one or more of
the thousands of available apps designed for Windows 8. The Store
is found in the Start screen, or use Search to search
the Store app for any apps that you are trying to find.
Friday, 24 May 2013
CSS Colors [for blog]
Colors are displayed combining RED, GREEN, and BLUE light.
Color Values
CSS colors are defined using a hexadecimal (hex) notation for the combination of Red, Green, and Blue color values (RGB). The lowest value that can be given to one of the light sources is 0 (hex 00). The highest value is 255 (hex FF).Hex values are written as 3 double digit numbers, starting with a # sign.
Color Examples
| Color | Color HEX | Color RGB |
|---|---|---|
| #000000 | rgb(0,0,0) | |
| #FF0000 | rgb(255,0,0) | |
| #00FF00 | rgb(0,255,0) | |
| #0000FF | rgb(0,0,255) | |
| #FFFF00 | rgb(255,255,0) | |
| #00FFFF | rgb(0,255,255) | |
| #FF00FF | rgb(255,0,255) | |
| #C0C0C0 | rgb(192,192,192) | |
| #FFFFFF | rgb(255,255,255) |
Try it yourself »
16 Million Different Colors
The combination of Red, Green and Blue values from 0 to 255 gives a total of more than 16 million different colors to play with (256 x 256 x 256).Most modern monitors are capable of displaying at least 16384 different colors.
If you look at the color table below, you will see the result of varying the red light from 0 to 255, while keeping the green and blue light at zero.
To see a full list of color mixes when the red light varies from 0 to 255, click on one of the hex or rgb values below.
Shades of Gray
Gray colors are displayed using an equal amount of power to all of the light sources. To make it easier for you to select the right gray color we have compiled a table of gray shades for you:| Gray Shades | HEX | RGB |
|---|---|---|
| #000000 | rgb(0,0,0) | |
| #080808 | rgb(8,8,8) | |
| #101010 | rgb(16,16,16) | |
| #181818 | rgb(24,24,24) | |
| #202020 | rgb(32,32,32) | |
| #282828 | rgb(40,40,40) | |
| #303030 | rgb(48,48,48) | |
| #383838 | rgb(56,56,56) | |
| #404040 | rgb(64,64,64) | |
| #484848 | rgb(72,72,72) | |
| #505050 | rgb(80,80,80) | |
| #585858 | rgb(88,88,88) | |
| #606060 | rgb(96,96,96) | |
| #686868 | rgb(104,104,104) | |
| #707070 | rgb(112,112,112) | |
| #787878 | rgb(120,120,120) | |
| #808080 | rgb(128,128,128) | |
| #888888 | rgb(136,136,136) | |
| #909090 | rgb(144,144,144) | |
| #989898 | rgb(152,152,152) | |
| #A0A0A0 | rgb(160,160,160) | |
| #A8A8A8 | rgb(168,168,168) | |
| #B0B0B0 | rgb(176,176,176) | |
| #B8B8B8 | rgb(184,184,184) | |
| #C0C0C0 | rgb(192,192,192) | |
| #C8C8C8 | rgb(200,200,200) | |
| #D0D0D0 | rgb(208,208,208) | |
| #D8D8D8 | rgb(216,216,216) | |
| #E0E0E0 | rgb(224,224,224) | |
| #E8E8E8 | rgb(232,232,232) | |
| #F0F0F0 | rgb(240,240,240) | |
| #F8F8F8 | rgb(248,248,248) | |
| #FFFFFF | rgb(255,255,255) |
Web Safe Colors?
Some years ago, when computers supported max 256 different colors, a list of 216 "Web Safe Colors" was suggested as a Web standard, reserving 40 fixed system colors.This is not important now, since most computers can display millions of different colors, but the choice is left to you.
The 216 cross-browser color palette was created to ensure that all computers would display the colors correctly when running a 256 color palette:
| 000000 | 000033 | 000066 | 000099 | 0000CC | 0000FF |
| 003300 | 003333 | 003366 | 003399 | 0033CC | 0033FF |
| 006600 | 006633 | 006666 | 006699 | 0066CC | 0066FF |
| 009900 | 009933 | 009966 | 009999 | 0099CC | 0099FF |
| 00CC00 | 00CC33 | 00CC66 | 00CC99 | 00CCCC | 00CCFF |
| 00FF00 | 00FF33 | 00FF66 | 00FF99 | 00FFCC | 00FFFF |
| 330000 | 330033 | 330066 | 330099 | 3300CC | 3300FF |
| 333300 | 333333 | 333366 | 333399 | 3333CC | 3333FF |
| 336600 | 336633 | 336666 | 336699 | 3366CC | 3366FF |
| 339900 | 339933 | 339966 | 339999 | 3399CC | 3399FF |
| 33CC00 | 33CC33 | 33CC66 | 33CC99 | 33CCCC | 33CCFF |
| 33FF00 | 33FF33 | 33FF66 | 33FF99 | 33FFCC | 33FFFF |
| 660000 | 660033 | 660066 | 660099 | 6600CC | 6600FF |
| 663300 | 663333 | 663366 | 663399 | 6633CC | 6633FF |
| 666600 | 666633 | 666666 | 666699 | 6666CC | 6666FF |
| 669900 | 669933 | 669966 | 669999 | 6699CC | 6699FF |
| 66CC00 | 66CC33 | 66CC66 | 66CC99 | 66CCCC | 66CCFF |
| 66FF00 | 66FF33 | 66FF66 | 66FF99 | 66FFCC | 66FFFF |
| 990000 | 990033 | 990066 | 990099 | 9900CC | 9900FF |
| 993300 | 993333 | 993366 | 993399 | 9933CC | 9933FF |
| 996600 | 996633 | 996666 | 996699 | 9966CC | 9966FF |
| 999900 | 999933 | 999966 | 999999 | 9999CC | 9999FF |
| 99CC00 | 99CC33 | 99CC66 | 99CC99 | 99CCCC | 99CCFF |
| 99FF00 | 99FF33 | 99FF66 | 99FF99 | 99FFCC | 99FFFF |
| CC0000 | CC0033 | CC0066 | CC0099 | CC00CC | CC00FF |
| CC3300 | CC3333 | CC3366 | CC3399 | CC33CC | CC33FF |
| CC6600 | CC6633 | CC6666 | CC6699 | CC66CC | CC66FF |
| CC9900 | CC9933 | CC9966 | CC9999 | CC99CC | CC99FF |
| CCCC00 | CCCC33 | CCCC66 | CCCC99 | CCCCCC | CCCCFF |
| CCFF00 | CCFF33 | CCFF66 | CCFF99 | CCFFCC | CCFFFF |
| FF0000 | FF0033 | FF0066 | FF0099 | FF00CC | FF00FF |
| FF3300 | FF3333 | FF3366 | FF3399 | FF33CC | FF33FF |
| FF6600 | FF6633 | FF6666 | FF6699 | FF66CC | FF66FF |
| FF9900 | FF9933 | FF9966 | FF9999 | FF99CC | FF99FF |
| FFCC00 | FFCC33 | FFCC66 | FFCC99 | FFCCCC | FFCCFF |
| FFFF00 | FFFF33 | FFFF66 | FFFF99 | FFFFCC | FFFFFF |
Tuesday, 21 May 2013
Disable USB ports on Windows PC via Registry
With this trick, you can disable access to your USB(Universal Serial
Bus) ports in your Windows based PC to prevent people from taking out
data from your personal computer without permission or spreading viruses
through the use of USB(pen and flash) drives.
To use this trick to disable USB ports, follow the steps given below:-

Try it yourself to make your PC invulnerable from data theft and malware which spread through USB ports. This works on Windows XP, Windows Vista, Windows 7 and Windows 8.
Note: This trick also disables access to your USB connected peripheral devices. So, do not use it if you have USB connected keyboard and mouse.
To use this trick to disable USB ports, follow the steps given below:-
- Click on Start.
- Click on Run. If you cannot find RUN, type it in the search box.
- Type "regedit" without quotes. This will launch the Registry Editor.
- Navigate to HKEY_LOCAL_MACHINE\SYSTEM\CurrentControlSet\Services\usbstor.
- In the work area, double click on Start.
- In the Value Data box, enter 4.
- Click on OK.
- Close Registry Editor and refresh your desktop.
- To re-enable access to your USB ports, enter 3 in the Value Data box in Step 6.
Try it yourself to make your PC invulnerable from data theft and malware which spread through USB ports. This works on Windows XP, Windows Vista, Windows 7 and Windows 8.
Note: This trick also disables access to your USB connected peripheral devices. So, do not use it if you have USB connected keyboard and mouse.
How hackers hack Facebook Account & How to stop them?
Facebook is, undoubtedly, the most popular social networking website
with more than 500 million active users. Due to its popularity, many
hackers (or should I say crackers?) are actively involved in hacking
Facebook accounts of unsuspecting users. This article outlines the many
strategies that such hackers use to gain access to Facebook accounts of
hundreds of users each day and how you can stop them from hacking your
account.
How to safeguard your Email Address?
Just follow these steps:-
How to prevent yourself from being phished?
At all costs, avoid clicking on suspicious links. Moreover, always check the URL in the address bar before signing in. Avoid logging in through various "Facebook widgets" offered by websites and blogs. Instead, use Facebook's homepage to sign in. Always try to use Safe Search while searching. If you do manage to get phished, report the website so that others may get a warning before visiting it.

How to stop keyloggers?
Install a good antivirus and update it frequently. Do not click on suspicious links and avoid downloading illegal software. Also, avoid installing free toolbars and other such spam software. Always scan third-person's flash and pen drives before using them on your computer.
How to prevent yourself from being socially engineered?
Stay aware during chats and discussions. Use a tough security question, preferably one whose answer you would never disclose to anyone. Moreover, Facebook, or any other company for that matter, will never ask you to change your password to 12345678 or do something as silly as asking you to send out your login details to prove that you are an active user. Always think before taking actions and your e-life on Facebook will be safe from hackers looking to hack Facebook accounts.
 |
| Facebook is one of the prime target of hackers! |
Email Address Hack
I have always been puzzled by Facebook's leniency in this matter. All a hacker needs to do is know your email address and he will be displayed a confirmation showing your name even if he enters the wrong password. How easily a hacker can then hack your Facebook account if he 'guesses' your password (if you use a weak password) or answers your security question! This is something I hope Facebook improves on quickly. Until Facebook does so, here are some tricks you can use to protect yourself from this vulnerability.How to safeguard your Email Address?
Just follow these steps:-
- Hide your Email Address from everyone by going to Edit Profile>Contact Information>Clicking on the icon beside your email address> checking 'Only Me'.
- Change your primary email address to a one that is only known to you by going to Account Settings>Email> and changing your primary email to the new one (known only to you) and removing your previous email address.
- For additional security, when in Account Settings, check 'Secure browsing' and 'Send me an email when a new computer or mobile device logs into this account' and click Save.
 |
| A hacker at work! |
Phishing
Phishing is one of the easiest ways to trick users into giving out their login credentials. All a hacker does is setup a webpage similar in design to that of the Facebook homepage, attach a server sided script to track the username and password entered and store it in a log. Sending people emails stating that someone tagged a photo of them on Facebook in the same format as Facebook and giving a link below to the phishing website further reduces the chances of it being detected as a fake. Sometimes, spam Facebook apps, like those promising to tell who viewed your Facebook profile, automatically post links to phishing websites. A new trend amongst phishers is creating Facebook look-a-like widgets for stealing user's login credentials.How to prevent yourself from being phished?
At all costs, avoid clicking on suspicious links. Moreover, always check the URL in the address bar before signing in. Avoid logging in through various "Facebook widgets" offered by websites and blogs. Instead, use Facebook's homepage to sign in. Always try to use Safe Search while searching. If you do manage to get phished, report the website so that others may get a warning before visiting it.
Keylogging through Keyloggers
Keylogger is a type of computer virus that tracks key strokes. Keyloggers can be installed remotely on a computer system by a cracker to record all the activity that is going on the victim's computer. Keylogging gets more easy if the hacker has physical access to the victim's computer.How to stop keyloggers?
Install a good antivirus and update it frequently. Do not click on suspicious links and avoid downloading illegal software. Also, avoid installing free toolbars and other such spam software. Always scan third-person's flash and pen drives before using them on your computer.
Social Engineering
Social engineering involves using any trick to fool the user into making himself vulnerable to exploits. This could involve anything from sending spoof emails, pretending to be from Facebook, telling you to change your password to 12345678 to a hacker maliciously getting out the answer to your Security Question in a friendly chat or discussion.How to prevent yourself from being socially engineered?
Stay aware during chats and discussions. Use a tough security question, preferably one whose answer you would never disclose to anyone. Moreover, Facebook, or any other company for that matter, will never ask you to change your password to 12345678 or do something as silly as asking you to send out your login details to prove that you are an active user. Always think before taking actions and your e-life on Facebook will be safe from hackers looking to hack Facebook accounts.
Recover Windows Password With Free Password Recovery Tools
There are times when you forget your Windows password or someone changes
it without your knowledge. In such situations, you will be locked out
of Windows. To regain access, you can use some password recovery
software to recover your Windows password. This article contains a list
of some such password recovery software.
 Note: Most of these software are available as Live CD's. (For non technical readers, a Live CD is a compact disk that contains a bootable operating system that you can use from the CD itself, without having the need to install it.)
Ophcrack
Ophcrack offers one of the best free password recovery solutions in the market. Ophcrack comes in two versions: a stand alone installer and a Live CD. The stand alone installer requires you to additionally download separate rainbow tables whereas the Live CD already has them. As the stand alone installer uses about 1.5GB of rainbow tables, it offers much better recovery. However, the download size is certainly an issue. Also, the Live CD version is a bit easier to use for cracking passwords.

So, I will discuss only the Live CD version. You must choose the right version of Ophcrack Live CD for your operating system. If you use Windows XP, the download (Ophcrack XP Live CD) is nearly 415MB whereas for Windows 7, Windows Vista and Windows 2008, it (Ophcrack Vista Live CD) is about 495MB. Ophcrack may be identified as a virus by your anti-virus software. That is a false alert and should be reported to the antivirus company.
To crack passwords with Ophcrack, download the iso file for the appropriate Live CD and burn it on a compact disk using an image burning software. If you use Windows 7, you can use your OS's inbuilt image burning software.
Then boot the computer whose password you wish to recover using that disk. Ophcrack is fully automatic and you don't need to do anything from your side. It will automatically detect users and start the password recovery process. Then, it will display their passwords on the screen. You can note them for logging in to the locked account.
Ophcrack recovers passwords nearly 99 times out of 100. Ophcrack is limited to recovering passwords upto 14 characters.
PC Login Now
If you mind downloading large amounts of data Ophcrack needs, then PC Login Now is an excellent alternative. In addition to its smaller size, its password recovery is one of the fastest and the easiest I have seen. However, PC Login Now does not actually recovers your password. It resets it.

To get started, you will need to download a nearly 60MB exe file from the PC Login Now website. Open the downloaded file to extract the ISO image of the Live CD. Burn the ISO file to a compact disk and then, boot your computer using the burned disk. PC Login Now will automatically load. Follow the on-screen instructions to choose your operating system and then the username whose password you wish to reset.
Then, choose the Password is empty checkbox to remove your password. Then, PC Login Now will ask you to reset another user's password. Choose No and then OK to restart your PC. Use a blank password while logging in and you are good to go. PC Login Now works on Windows 7, Windows XP and Windows Vista.
Offline NT Password Recovery & Registry Editor
Another open source recovery software that resets forgotten Windows passwords. Offline NT Password Recovery is also needed to be installed on a CD before working. However, there is also a version that can be installed on USB drives to create a bootable usb drive (if your motherboard supports it). Its small size (nearly 3MB) makes it an excellent alternative to other bulky recovery options.

It just has one con. Its interface being completely text based is not for the lovers of GUI based systems. To reset your password, just boot into your computer using the Live CD or the USB drive and follow the on-screen instructions. Your password will be changed to a blank one. This software works on Windows 7, Windows XP, Windows NT and Windows Vista. It also supports 64 bit versions of these Operating systems.
Cain & Abel
Cain & Abel is another free password recovery software. Unlike the software mentioned above, Cain & Abel needs to be installed on another administrator account on the computer containing the locked account. It also requires separate downloading of rainbow tables. Since, you can use inbuilt Windows functions to reset a password if you have access to a working admin account on the computer, I see no use for this software unless you are desperate about recovering your password. Cain & Abel works only on Windows XP.
Ophcrack
Ophcrack offers one of the best free password recovery solutions in the market. Ophcrack comes in two versions: a stand alone installer and a Live CD. The stand alone installer requires you to additionally download separate rainbow tables whereas the Live CD already has them. As the stand alone installer uses about 1.5GB of rainbow tables, it offers much better recovery. However, the download size is certainly an issue. Also, the Live CD version is a bit easier to use for cracking passwords.
So, I will discuss only the Live CD version. You must choose the right version of Ophcrack Live CD for your operating system. If you use Windows XP, the download (Ophcrack XP Live CD) is nearly 415MB whereas for Windows 7, Windows Vista and Windows 2008, it (Ophcrack Vista Live CD) is about 495MB. Ophcrack may be identified as a virus by your anti-virus software. That is a false alert and should be reported to the antivirus company.
To crack passwords with Ophcrack, download the iso file for the appropriate Live CD and burn it on a compact disk using an image burning software. If you use Windows 7, you can use your OS's inbuilt image burning software.
Then boot the computer whose password you wish to recover using that disk. Ophcrack is fully automatic and you don't need to do anything from your side. It will automatically detect users and start the password recovery process. Then, it will display their passwords on the screen. You can note them for logging in to the locked account.
Ophcrack recovers passwords nearly 99 times out of 100. Ophcrack is limited to recovering passwords upto 14 characters.
PC Login Now
If you mind downloading large amounts of data Ophcrack needs, then PC Login Now is an excellent alternative. In addition to its smaller size, its password recovery is one of the fastest and the easiest I have seen. However, PC Login Now does not actually recovers your password. It resets it.
To get started, you will need to download a nearly 60MB exe file from the PC Login Now website. Open the downloaded file to extract the ISO image of the Live CD. Burn the ISO file to a compact disk and then, boot your computer using the burned disk. PC Login Now will automatically load. Follow the on-screen instructions to choose your operating system and then the username whose password you wish to reset.
Then, choose the Password is empty checkbox to remove your password. Then, PC Login Now will ask you to reset another user's password. Choose No and then OK to restart your PC. Use a blank password while logging in and you are good to go. PC Login Now works on Windows 7, Windows XP and Windows Vista.
Offline NT Password Recovery & Registry Editor
Another open source recovery software that resets forgotten Windows passwords. Offline NT Password Recovery is also needed to be installed on a CD before working. However, there is also a version that can be installed on USB drives to create a bootable usb drive (if your motherboard supports it). Its small size (nearly 3MB) makes it an excellent alternative to other bulky recovery options.
It just has one con. Its interface being completely text based is not for the lovers of GUI based systems. To reset your password, just boot into your computer using the Live CD or the USB drive and follow the on-screen instructions. Your password will be changed to a blank one. This software works on Windows 7, Windows XP, Windows NT and Windows Vista. It also supports 64 bit versions of these Operating systems.
Cain & Abel
Cain & Abel is another free password recovery software. Unlike the software mentioned above, Cain & Abel needs to be installed on another administrator account on the computer containing the locked account. It also requires separate downloading of rainbow tables. Since, you can use inbuilt Windows functions to reset a password if you have access to a working admin account on the computer, I see no use for this software unless you are desperate about recovering your password. Cain & Abel works only on Windows XP.
Convert FAT32 to NTFS Without Formatting or Losing Data
ou have a flash drive or probably an external hard drive that currently
has FAT32 file system and you want to change it to NTFS, because FAT32
does not support handling large files (over 4GB) or it is just simply
old for your taste but there is just one problem, you don't want to lose
your saved data. This article is for you then as it explains exactly
how you can achieve seamless transition from FAT to NTFS without
involving any data loss.

While it is generally recommended to use the NTFS file system because of its stability, security and lesser defragmentation time, most of us end up using FAT32 because that is what most disks are preformatted with. Unless, we notice the “Not enough disk space error” despite disk space being available, we don't bother to change the file system. Moreover, most of us don't change it because of the risk of losing important data and lack of time (read laziness). As Microsoft was aware of this scenario, they added a capability in the command prompt to overcome this by executing a simple command. There are many software that support this too but the Convert command is one of the easiest ways to do so. Follow the steps below to know how:-
Important: While this method works perfectly, I would still advise you to backup your data in case anything goes wrong.
2) Click on Start.
3) Type cmd in the search bar if you use Windows 7, Windows 8 or Windows Vista. If you use Windows XP, click on Run and then execute cmd.
4) Execute "chkdsk h: /f " (without quotes) where H is the letter of the drive to undergo conversion. This checks the drive for errors and fixes them automatically.
5) Execute "Convert H: /FS:NTFS" (without quotes). H is again the letter of the drive to be converted.
6) The command prompt will start the conversion process and after a few minutes, CMD will say that conversion was successful.
7) You can check it in the properties of the drive through right click<Properties.

This works on Windows 7, Windows XP, Windows 8 and Windows Vista. I converted my flash drive's file system using these steps and it worked flawlessly. It is interesting to note that this method cannot be used to reconvert NTFS file system back to FAT32. To reconvert back to FAT32, you will need to format the entire drive which will definitely cause data loss.
While it is generally recommended to use the NTFS file system because of its stability, security and lesser defragmentation time, most of us end up using FAT32 because that is what most disks are preformatted with. Unless, we notice the “Not enough disk space error” despite disk space being available, we don't bother to change the file system. Moreover, most of us don't change it because of the risk of losing important data and lack of time (read laziness). As Microsoft was aware of this scenario, they added a capability in the command prompt to overcome this by executing a simple command. There are many software that support this too but the Convert command is one of the easiest ways to do so. Follow the steps below to know how:-
Important: While this method works perfectly, I would still advise you to backup your data in case anything goes wrong.
FAT 32 to NTFS Conversion Steps
1) Go to Computer, and note the name of the drive whose file system you wish to convert.2) Click on Start.
3) Type cmd in the search bar if you use Windows 7, Windows 8 or Windows Vista. If you use Windows XP, click on Run and then execute cmd.
4) Execute "chkdsk h: /f " (without quotes) where H is the letter of the drive to undergo conversion. This checks the drive for errors and fixes them automatically.
5) Execute "Convert H: /FS:NTFS" (without quotes). H is again the letter of the drive to be converted.
6) The command prompt will start the conversion process and after a few minutes, CMD will say that conversion was successful.
7) You can check it in the properties of the drive through right click<Properties.
This works on Windows 7, Windows XP, Windows 8 and Windows Vista. I converted my flash drive's file system using these steps and it worked flawlessly. It is interesting to note that this method cannot be used to reconvert NTFS file system back to FAT32. To reconvert back to FAT32, you will need to format the entire drive which will definitely cause data loss.
Saturday, 18 May 2013
Install, Boot Windows from USB Pen, Thumb or Flash Drive
Normally, Windows is installed using optical media like DVDs and CDs but
there are times when it is not possible to boot into the windows setup
using disks probably because your DVD drive is not working or, if you
are using one of those ultra-portable laptops, it is not there at all.
 To
overcome this problem, one can either use an external DVD drive and
install Windows normally or create a bootable pen drive to install
Windows whenever needed. In this tutorial, we will discuss about the
latter and learn how can we create a bootable USB drive
for installing Windows XP, Windows Vista, Windows 7 or Windows 8. As
installing Windows from a flash drive is much faster than from a CD/
DVD, such an installation will also save time.
To
overcome this problem, one can either use an external DVD drive and
install Windows normally or create a bootable pen drive to install
Windows whenever needed. In this tutorial, we will discuss about the
latter and learn how can we create a bootable USB drive
for installing Windows XP, Windows Vista, Windows 7 or Windows 8. As
installing Windows from a flash drive is much faster than from a CD/
DVD, such an installation will also save time.
This article assumes that your computer has a mother board which supports booting from USB drives. Most modern laptops and desktops support it. If you have bought your computer in the past 5 years, you do not need to worry about this.
Installation Requirements
This article assumes that your computer has a mother board which supports booting from USB drives. Most modern laptops and desktops support it. If you have bought your computer in the past 5 years, you do not need to worry about this.
- An empty flash drive with a storage capacity of 1GB for Windows XP and 3GB for Windows 8, Windows 7, Windows Vista and Windows Server 2008.
- Windows installation disk or Windows installation files stored somewhere on your computer.
Steps to create a bootable USB Flash Drive
- Download Win to Flash. The software is still in beta phase so it is possible that it has some bugs although I have personally faced none. The latest version of Win to Flash can be downloaded from the Win to Flash website. The latest version also supports Windows 8. To avoid this tutorial from getting outdated, I would advise to download the software from the former link if you are not planning on using Windows 8.
- Extract the downloaded zip file to any folder on your desktop.
- Open the folder and run WintoFlash.exe by double clicking on it.
- Click Next, check I accept EULA, click Next and Next again. Wait for the software to load some ads, click Next and Next again.
- A welcome screen like one in the image below will show up.
- Click on the big green tick. The welcome screen will turn translucent and WinToFlash wizard will open.
- Click Next. On Windows File path entry box, click Select button and select the location of your Windows disk, or the folder containing the Windows setup files and click OK.
- On USB Drive path entry box, select your USB flash drive's location and click OK.
- Click Next button. In the dialog box, encircle I accepted the license agreement and click Continue.
- A warning message will be displayed saying that "Formatting will erase all data on the disk". Click OK on the message.
- WintoFlash will show a window with a progress bar like the one in the image below.
- After the progress bar reaches the end, press Next and then press Exit. A notification to update WintoFlash might be shown, click "No just close" to close it.
 |
| Win to Flash welcome screen |
 |
| Wizard showing the various version of Windows it supports |
 |
| Preparing a bootable pen drive |
That's it. You now have a bootable pen drive that can be used
to install Windows. To install Windows from it, follow the steps given
below:-
This tutorial works on all versions of Windows including Windows 8, Windows 7, Windows XP and Windows Vista.
Installing Windows from the bootable USB Thumb Drive
- Plugin your thumb drive.
- Start your computer. Go into the BIOS setup by pressing the Delete key. In the boot menu, select your flash drive as the first boot device. Save settings and restart your PC. (This step might be different for different computers. Check your system guide to know how to change the boot order in your PC.)
- Windows setup will load.
- Install Windows by following the on-screen instructions.
PC Security Tips : Make Computer Secure
Here are some tips which will enable you to make your PC more secure.
Anti-virus
1. Never, ever turn off the resident protection of your antivirus even if it decreases performance. Upgrade if necessary.
2. Keep your virus definitions up-to-date. Use the automatic update feature of your anti-virus and try not to ignore the "Do you want to update now" message however often it might pop up.
3. Even if you update regularly and you have not seen any suspicious activity on your PC, do a deep scan at least once a month.
4. Always create an emergency boot disk and keep it in a safe place.

5. Run a deep scan in safe mode at least once every two months to kill viruses that would otherwise remain hidden.
Firewalls
1. If you are unsure about the alert displayed by your firewall, try searching it on the internet.
2. A firewall is a powerful tool that requires an understanding of how the program works and exactly what it is doing and whether it is secure or not. Reading the help files is extremely important in successful configuration of your firewall.

3. If you are running a third party firewall,be sure to turn off the Windows Firewall.
4. You can temporarily disable a firewall by right clicking the icon in the tray. This is handy when you know a site is one you can trust but your firewall is blocking it. But remember to re-enable it as soon as possible.
5. Read firewall notices carefully when they pop up so that you don't let a bad thing in or prevent good traffic.
Anti-Spyware
1. You should regularly check for updates. Enable the automatic update feature.
2. Remember to do a scan every now and then, or schedule scans if your program allows it. If you don't want to sit that long for scans to complete, use a single folder for all your downloads, then scan only that folder, Windows installation folder and the Registry. Alternately, you can do a quick scan if your program allows it.
Anti-Spam
1. Be patient with anti-spam software, it will get better over time.
2. Even if it looks that your anti-spam software is working great, periodically check the 'Spam' folder for good mail. None of the anti-spam software is perfect right now.
3. Don't give your anti-spam software too much rules, because it will not learn anything then. It is better if it learns on its own.
Anti-virus
1. Never, ever turn off the resident protection of your antivirus even if it decreases performance. Upgrade if necessary.
2. Keep your virus definitions up-to-date. Use the automatic update feature of your anti-virus and try not to ignore the "Do you want to update now" message however often it might pop up.
3. Even if you update regularly and you have not seen any suspicious activity on your PC, do a deep scan at least once a month.
4. Always create an emergency boot disk and keep it in a safe place.
5. Run a deep scan in safe mode at least once every two months to kill viruses that would otherwise remain hidden.
Firewalls
1. If you are unsure about the alert displayed by your firewall, try searching it on the internet.
2. A firewall is a powerful tool that requires an understanding of how the program works and exactly what it is doing and whether it is secure or not. Reading the help files is extremely important in successful configuration of your firewall.
3. If you are running a third party firewall,be sure to turn off the Windows Firewall.
4. You can temporarily disable a firewall by right clicking the icon in the tray. This is handy when you know a site is one you can trust but your firewall is blocking it. But remember to re-enable it as soon as possible.
5. Read firewall notices carefully when they pop up so that you don't let a bad thing in or prevent good traffic.
Anti-Spyware
1. You should regularly check for updates. Enable the automatic update feature.
2. Remember to do a scan every now and then, or schedule scans if your program allows it. If you don't want to sit that long for scans to complete, use a single folder for all your downloads, then scan only that folder, Windows installation folder and the Registry. Alternately, you can do a quick scan if your program allows it.
Anti-Spam
1. Be patient with anti-spam software, it will get better over time.
2. Even if it looks that your anti-spam software is working great, periodically check the 'Spam' folder for good mail. None of the anti-spam software is perfect right now.
3. Don't give your anti-spam software too much rules, because it will not learn anything then. It is better if it learns on its own.
Cool JavaScript Tricks: Edit Websites in Browser (Live)
Imagine a world where you are a God and have ultimate control on what
happens and more importantly, how it happens. Seems too good a dream.
Now it has come true, at least for the online world.
 Using
this trick, you will be able to edit any webpage live in your browser
as if it was a Wiki and change the details according to your wish. Yes,
you read that right. You can edit Google or even Facebook
for that matter right in your browser and that too without requiring
any technical know-how or getting deep into hacking and cracking.
Using
this trick, you will be able to edit any webpage live in your browser
as if it was a Wiki and change the details according to your wish. Yes,
you read that right. You can edit Google or even Facebook
for that matter right in your browser and that too without requiring
any technical know-how or getting deep into hacking and cracking.
Here is an example picture demonstrating the Google Homepage edited by me to say that I own Google.

This is just an example. You can use it for anything like showing wrong traffic stats or for fooling people by showing that someone said something about them on Facebook or Twitter. It depends only on your creativity. But I would advise you to stay ethical and use it for entertainment purposes only.
(Mozilla Firefox does not support this. If you use Firefox, you can use the bookmarklets given at the end of this post. If you use Google Chrome and the code does not seem to work, precede it with "javascript:" without quotes.)
To use this trick, all you need to do is just copy the code given below and paste it in your address bar after you have opened the website you wish to edit. And start editing.
Or, alternatively you can use the following bookmarklets by dragging them to your Bookmarks bar.
The editing that you do will however be temporary as it is not server-sided. You can also save the modified website through your browser by File>Save. This works on all common web browsers including Chrome, Firefox, Opera and Internet Explorer.
Here is an example picture demonstrating the Google Homepage edited by me to say that I own Google.
This is just an example. You can use it for anything like showing wrong traffic stats or for fooling people by showing that someone said something about them on Facebook or Twitter. It depends only on your creativity. But I would advise you to stay ethical and use it for entertainment purposes only.
(Mozilla Firefox does not support this. If you use Firefox, you can use the bookmarklets given at the end of this post. If you use Google Chrome and the code does not seem to work, precede it with "javascript:" without quotes.)
To use this trick, all you need to do is just copy the code given below and paste it in your address bar after you have opened the website you wish to edit. And start editing.
javascript:document.body.contentEditable%20=%20'true';%20document.designMode='on';%20void%200You can capture a screenshot by pressing the Print Screen key or by using the Snipping Tool if you use Windows 7 or Windows Vista. If you wish to again make the website non-editable to give a more authentic look, copy and paste the code given below in the address bar after you are done editing (does not work in Firefox).
javascript:document.body.contentEditable%20=%20'false';%20document.designMode='off';%20void%200
Or, alternatively you can use the following bookmarklets by dragging them to your Bookmarks bar.
1. Edit this Website
2. Done Editing
The editing that you do will however be temporary as it is not server-sided. You can also save the modified website through your browser by File>Save. This works on all common web browsers including Chrome, Firefox, Opera and Internet Explorer.
Subscribe to:
Comments (Atom)


